tl;dr: In which I attempt to montage jpeg which comprises areas of differing internal jpeg quality, for fun and, er… artistic geeky interest.
You see, once upon a time, I was thinking about lossless jpeg editing. The sort that jpegtran can do.
jpegtran (1) - lossless transformation of JPEG files
Specifically, jpegtran can (with some understandable limits) rotate/flip and mirror losslessly, and also crop – for values of “lossless” that only apply to the cropped image data.
I soon got to wondering if the reverse could also be true. If jpeg image data can be cropped losslessly; then it must not rely on surrounding data and so surely paste is equally possible.
I researched some and found… http://www.imagemagick.org/Usage/formats/#jpg_lossless. If you scroll down to the ‘Mixed JPEG Quality’ section it’s suggested:
* use jpegtran to merge the q60 on top of the q100
“So”, I thinks to myself, “…jpegtran can do that, huh?”
Turns out that it can’t. Not the version currently in Debian anyway.
…But an experimental version can. See the version that the chaps have here: http://jpegclub.org/jpegtran/
The information on that page indicates to me that the ‘drop’ option has been experimental since 2000 at least… and I wonder why it’s not mainstream then. But, let’s take a look anyway. There are helpful binaries and a sample script provided, but I had something a bit more fun in mind.
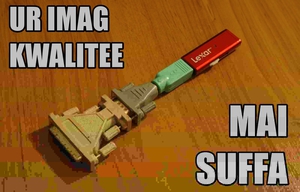
One download later, and some fiddling around… and here is this! IMAG KWALITEE for all!
Counting from the bottom where it’s most evident, the rows of 80 pixels high each are of quality 1, 4, 5, 6, 7, 8, 9, 10, 15, 20, 50, and the final 144 pixels at the top are original (ie, camera sourced jpeg with text composited in and saved at quality 100).
The resulting image is 153k in size. In this example, a normal save of the source (captioned) image at a quality of 72 results in an image of equivalent size.
Speaking of size, since the cropped rows exist as images on their own, I can also see how much space each quality section uses. So the q1 row (80pixels high – or about 8% of the final image) is just a tad over 3k in size – that is, about 2% of the bytes, and even the quality 50 stripe is only 8k – 5.5% of the bytes. However, the q100 stripe at the top – 144 pixels comprising 14% of the pixel space, and is a whopping 66% of the bytes!
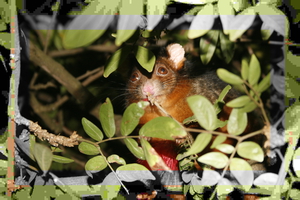
In another example image, I discovered that you cannot drop a colour segment onto a greyscale image (but you CAN drop a greyscale segment onto a colour image, and then subsequently drop a colour segment within the greyscale. The resulting possum is shown, but I wont go into the making-of here.
Additional notes
In creating this, I found a few caveats…
- Make sure the crops and drops are aligned on the jpeg iMCU boundaries, or headaches ensue since the crop size will be silently altered in position (as, I think, is the drop). I made all my changes on the boundary of 16×16 blocks, though 8×8 is also possible (I believe this may depend on the jpeg)
- I had to set the caption text to a light grey after I found that pure white would cause jpeg errors when dropping (DCT coefficient out of range). I don’t know if this is a bug, or just a limitation in what’s possible due to jpeg encoding.
- A colour jpeg loses it’s colour when dropped onto a greyscale jpeg. Specifically:
- crop ‘cropped.jpg’ from colour source.jpg
- also create greyscale.jpg from source.jpg
- drop ‘cropped.jpg’ back onto the original location within greyscale.jpg to create merged.jpg
- merged.jpg is not a grey-with-colour-segment jpeg, but is all grey. in fact, it’s so grey that merged.jpg and greyscale.jpg are binary identical!
- note: tested just once :)
- real-world practical applications of this? http://www.photopla.net/wwp0703/stripes.php …that’s probably about it. Any stylistic effect from this is likely achievable with less effort via a standard photo editor (The GIMP, etc) with the cost of a few % in filesize when saving at a high enough quality to ensure actual jpeg artifacts don’t spoil the effect.
This page is derived from my wiki notes on the subject, which include additional information/updates for the inquisitive.

